How to create a circuit with multiple registers
Creating and running a circuit with multiple quantum and classical registers with Fire Opal
As quantum circuits grow in size and complexity, introducing logical structure makes them easier to read, debug, and analyze. Blocks of classical and quantum bits within a circuit can be grouped into multiple registers according to their purpose. Such groupings are for organizational convenience and do not inherently change how the circuit executes, nor the optimizations that Fire Opal runs. One common example where grouping qubits into multiple logical registers is often seen is in Quantum Error Correction (QEC) algorithms, where some qubits encode logical state and others are used to detect and correct errors.
In this guide, you will learn to:
- Define a circuit with multiple quantum and classical registers
- Run the circuit via Fire Opal
1. Set up your environment
First, import the necessary packages. In this example, Qiskit is used to create the circuit, but you can use any preferred programming framework, export the circuit to QASM, and pass it to fireopal.execute.
from qiskit import QuantumCircuit, ClassicalRegister, QuantumRegister, qasm3
import fireopal as fo
import json
# Set credentials
token = "YOUR_IBM_CLOUD_API_KEY"
instance = "YOUR_IBM_CRN"
credentials = fo.credentials.make_credentials_for_ibm_cloud(
token=token, instance=instance
)Q-CTRL authentication successful!
2. Define the quantum registers
In Qiskit, you can use the QuantumRegister class to create and label groups of qubits known as quantum registers. For example, in Quantum Error Correction repetition codes, qubits play two roles: one quantum register, labeled as "code qubit," stores the logical state, and the other, labeled as "ancilla qubit," is used to detect and correct errors.
code_qubit = QuantumRegister(2, name="code_qubit")
ancilla_qubit = QuantumRegister(1, name="ancilla_qubit")
3. Define the classical registers
Two classical registers will be defined to demonstrate multi-register functionality:
- syndrome_bit: Used to store the measured state of the ancilla qubit
- data_bits: Used to store the measured states of the code qubits
syndrome_bit = ClassicalRegister(1, "syndrome_bit")
data_bits = ClassicalRegister(2, "data_bits")
4. Create the circuit and add gates
A circuit can be initialized from the predefined registers. Starting with the $|\phi_+ \rangle= \frac {1}{\sqrt{2}} (|00 \rangle +|11 \rangle)$ Bell State, two CX gates will be added to entangle the code qubits with the ancilla qubit, then both the ancilla qubit and code qubits will be measured and stored in their respective classical registers.
qc = QuantumCircuit(code_qubit, ancilla_qubit, syndrome_bit, data_bits)
qc.h(code_qubit[0])
qc.cx(code_qubit[0], code_qubit[1])
qc.barrier(code_qubit)
qc.cx(code_qubit[0], ancilla_qubit[0])
qc.cx(code_qubit[1], ancilla_qubit[0])
qc.measure(ancilla_qubit, syndrome_bit)
qc.measure(code_qubit, data_bits)
qc.draw(output="mpl")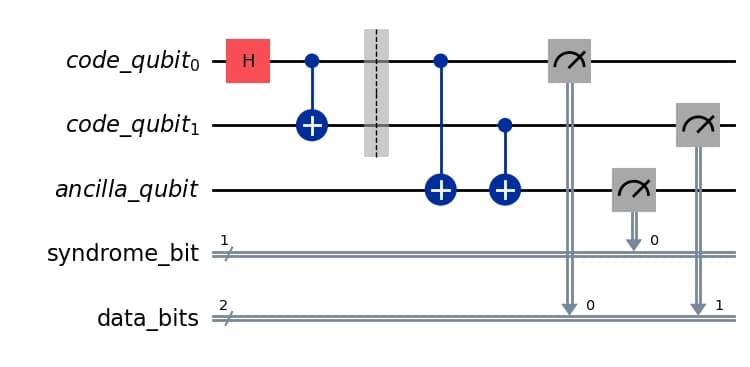
5. Run the circuit using Fire Opal
Choose a backend to run the circuit. Run fo.show_supported_devices(credentials) to get a list of suppported backend names.
# Replace "your_desired_backend" with the name of the device you wish to use.
backend_name = "your_desired_backend"
shot_count = 1024
fire_opal_job = fo.execute(
circuits=[qasm3.dumps(qc)],
shot_count=shot_count,
credentials=credentials,
backend_name=backend_name,
)Note: We are introducing a new format to represent our execution results that will be available under
fire_opal_job.result()["execution_results"]during the sunset period while having single classical register results still present infire_opal_job.result()["results"]. In the future, theexecution_resultswill be removed and the new results format will replace the entry inresults.
fire_opal_results = fire_opal_job.result()["execution_results"][0]
print(json.dumps(fire_opal_results, indent=2))
{
"data_bits": {
"00": 0.47144573167880355,
"01": 0.010521887427780981,
"10": 0.03156612552746112,
"11": 0.48646625536595445
},
"syndrome_bit": {
"0": 0.9440084049193498,
"1": 0.05599159508065021
}
}
Since the code qubits start in the initial state $|\phi_+ \rangle$, the expected result should be:
- syndrome_bit:
'0'(ancilla qubit measurement) - data_bits:
'00'and'11'(code qubits measurements)
The new multi-register API allows you to access each register's results separately using the register names you defined (for example, execution_results["syndrome_bit"]).
When running on real hardware, there is always bound to be a bit of noise, but Fire Opal suppressed most of the hardware errors to largely get the correct result.
In summary, this example demonstrates how to define and run quantum circuits with multiple registers, showing how Fire Opal integrates seamlessly with different workflows while providing robust error suppression for practical experimentation.
The following package versions were used to produce this notebook.
from fireopal import print_package_versions

print_package_versions()
| Package | Version |
| --------------------- | ------- |
| Python | 3.12.9 |
| matplotlib | 3.10.1 |
| networkx | 3.5 |
| numpy | 2.3.2 |
| qiskit | 1.4.2 |
| sympy | 1.14.0 |
| fire-opal | 9.0.2 |
| qctrl-workflow-client | 6.0.0 |
